With the advent of high resolution “retina” displays, keeping bitmap images sharp and crisp on the web has meant using larger and thus more bandwidth-hungry images. At the same time, more and more people are browsing on mobile devices where bandwidth is at a premium.
One solution to this problem is scalable vector graphics (SVG) since they scale infinitely while keeping the file size low. However, now that web fonts are widely supported, symbol fonts like Dingbats or WebDings provide another option for tack sharp symbols used in icons or buttons. Fonts are also very flexible. For example, using CSS you can easily change the size, color, add drop shadows or other text effects.
But what happens when symbol typefaces don’t have the symbols you need? Well, make your own of course! Today I am going to show you how make your own symbol font using some freely available software and tools, which you can then easily embed in a web page and use in your design comps.
Here are a few things you will need before we get started:
- Some SVG files – you will need some SVG symbols to embed in your font. I’ve included a zip file here with a few symbols to get you started. If you need more, the noun project is a great resource.
- Adobe Illustrator – for preparing your SVG files (if you grab the ones I have included above, you can skip this step)
- Inkscape – this is an open source vector drawing tool. It’s available for Windows or OS X. This tutorial will be showing the Mac version, but the Windows steps are almost identical.
- The starter font file – download this blank font file from Github to use as your starting point.
Step 0: Prepare your SVG files in Illustrator
If you grabbed my sample SVG files you can skip this step, but if you are using your own vector images you will probably need to run them through Illustrator first. First, open your vector image and select it. Then from the menu select Object -> Compound Path -> Make. Finally, select File -> Save As for format select SVG (svg) and then save it somewhere you can easily find it. An SVG Options window will popup, just leave the default options and click OK.
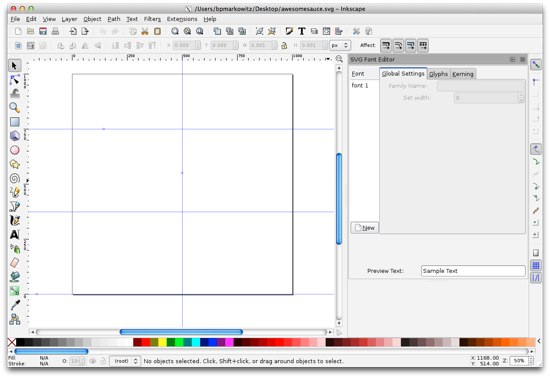
Step 1: Get Inkscape ready
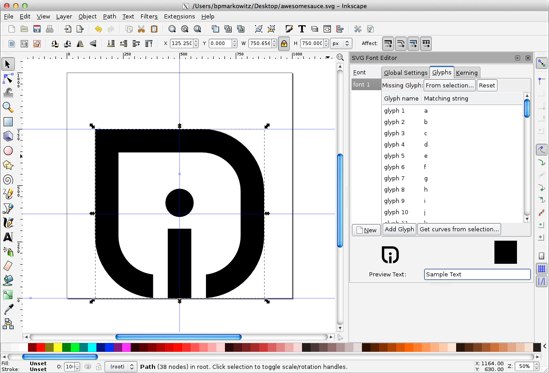
Open the starter font file in Inkscape. Go ahead and save it with a new name, I’m calling mine
awesomesauce.svg. Next, from the
Text menu, select
SVG Font Editor. This will enable the font editor pallet on the right side. Your window should look like this:
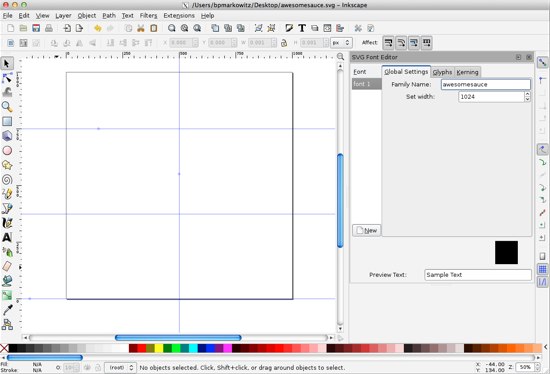
Step 2: Font family name
In the
SVG Font Editor on the right hand side of the window click on
font 1 so it is highlighted. Then, in the
Family Name text box, give your font family a name. Again, I’m using
awesomesauce.
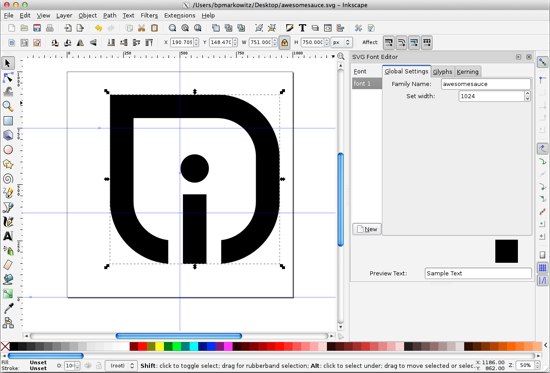
Step 3: Import a symbol
Now it’s time to add the first symbol to our font. From the File menu, select Import. Select the svg file you want to add to your font. I’m going to select intridea.svg (what symbol font would be complete without the Intridea logo?).
Step 4: Size the symbol
Now we need to size the symbol. It’s good to keep all your glyphs a similar size. Experimenting has shown me that keeping them about 750px high in Inkscape will keep them roughly the same height as a capital letter. In the top tool bar, click the
Lock icon to lock the aspect ratio and manually enter the hight as
750px.
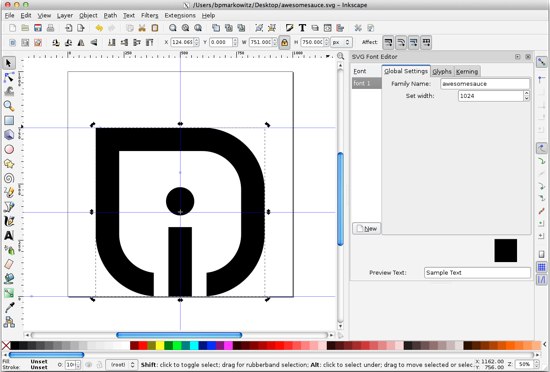
Step 5: Position your symbol
Positioning the symbol is also very important. Move the symbol to the bottom of the work area. You can do this easily by entering
0px in the
Y box on the toolbar. Then, center the symbol (you should see a centered guide line to help you, and you can use the arrow keys for minute adjustments). Once you have it sized and positioned properly, it should look like this:
Step 6: Add a symbol
Now it’s time to add the symbol to your font. Make sure the symbol is selected by clicking on it (it should have a box around it). Over in the
SVG Font Editor palette, click on
font 1 then click the
Glyphs tab. Then, select
glyph 1 a so it is highlighted and finally, click the
Get Curves from selection button. This will assign that shape to the selected glyph. In this example, the lower case a.
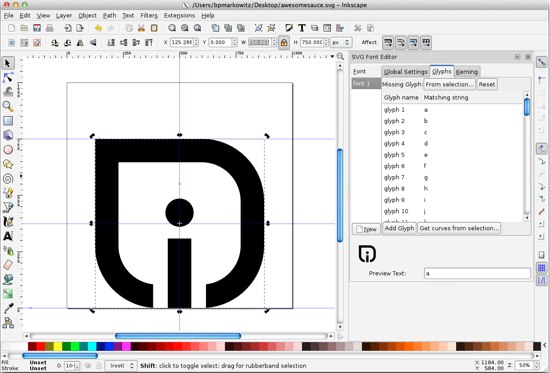
Step 7: Test your font
You can test if it worked by entering a lower case a into the
Preview Text window. If it worked, you should see the Intridea logo in the preview area!
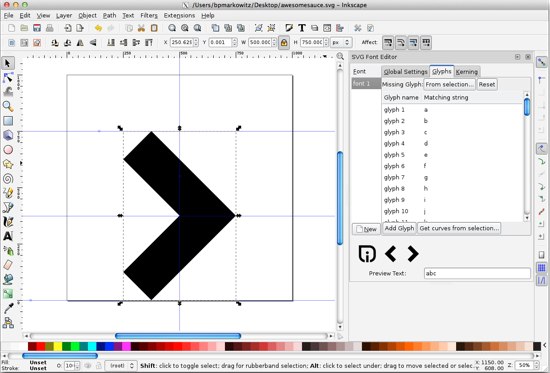
Step 8: Rinse and Repeat
If you are happy with your symbol you added, delete it from your work area and repeat steps 3 through 7 adding each symbol to a different glyph. When you are done, save your file and head to step 9.
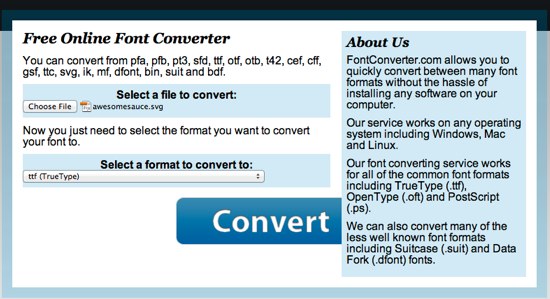
Step 9: Convert to a TrueType Font
Next we need to convert this to a usable font. So head to
http://www.freefontconverter.com/. Click the
Chose File button and browse for your file you saved in step 8. From the
Select a format to convert to:
select ttf(TrueType) and click the
Convert button. Your browser should download your new font file.
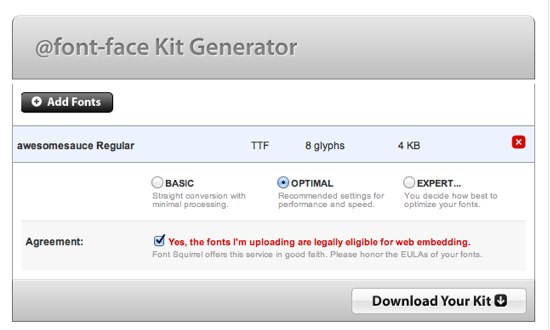
Step 10: Generate a @font-face kit
In this step we will generate a font-face kit that is compatible with almost all browsers. The downloadable kit features great instructions on using your font on the web. Head on over to the
Font Squirrel font-face generator. Click the
Add fonts button and select your TrueType font from step 9. Select the
Optimal setting, agree to their terms and click
Download Your Kit.
You did it!
Open up the folder you downloaded in step 10. In the folder, you should see a .ttf TrueType font. In my case, it’s called awesomesauce-webfont.ttf. Double click it to open the font and install it. Now your font is available anywhere in your OS to use in your design comps!
In the folder you will find an HTML demo file from Font Squirrel. In my example, it is called awesomesauceRegular-demo.html. Open this file in a browser. It will show your font as well as provide instructions on embedding your font in a web page. Also, be sure to check out Pictos for some more info on using icon fonts.


